How Supabase Powers Mockury

I'm a self-taught web developer. I occasionally post summaries of my projects and what I learned from them. Thanks for tuning in! ❤
If you follow me on Twitter, you have probably heard about the project I'm working on called Mockury. I'm constantly posting updates about it on there as part of my second take on the #100DaysOfCode challenge. If you haven't heard about it, Mockury is the go-to place for mock-ups of digital products such as eBooks.
Mockury is one of my biggest side projects yet, so building a whole backend from scratch would cost a lot of time, which I could invest into other parts of this project. Gladly, Supabase takes care of the Database and Authentication. In this blog post, I will show you exactly what I mean by that and how you can implement them into your project.
Authentication
Mockury is in its early days right now, as it hasn't even “officially” launched yet. This means it doesn't have any pricing plans, which would limit one or another feature where we would need to differentiate users. Although this is planned, there is a use case for authentication that is implemented into Mockury already now. I'm talking about the newsletter.
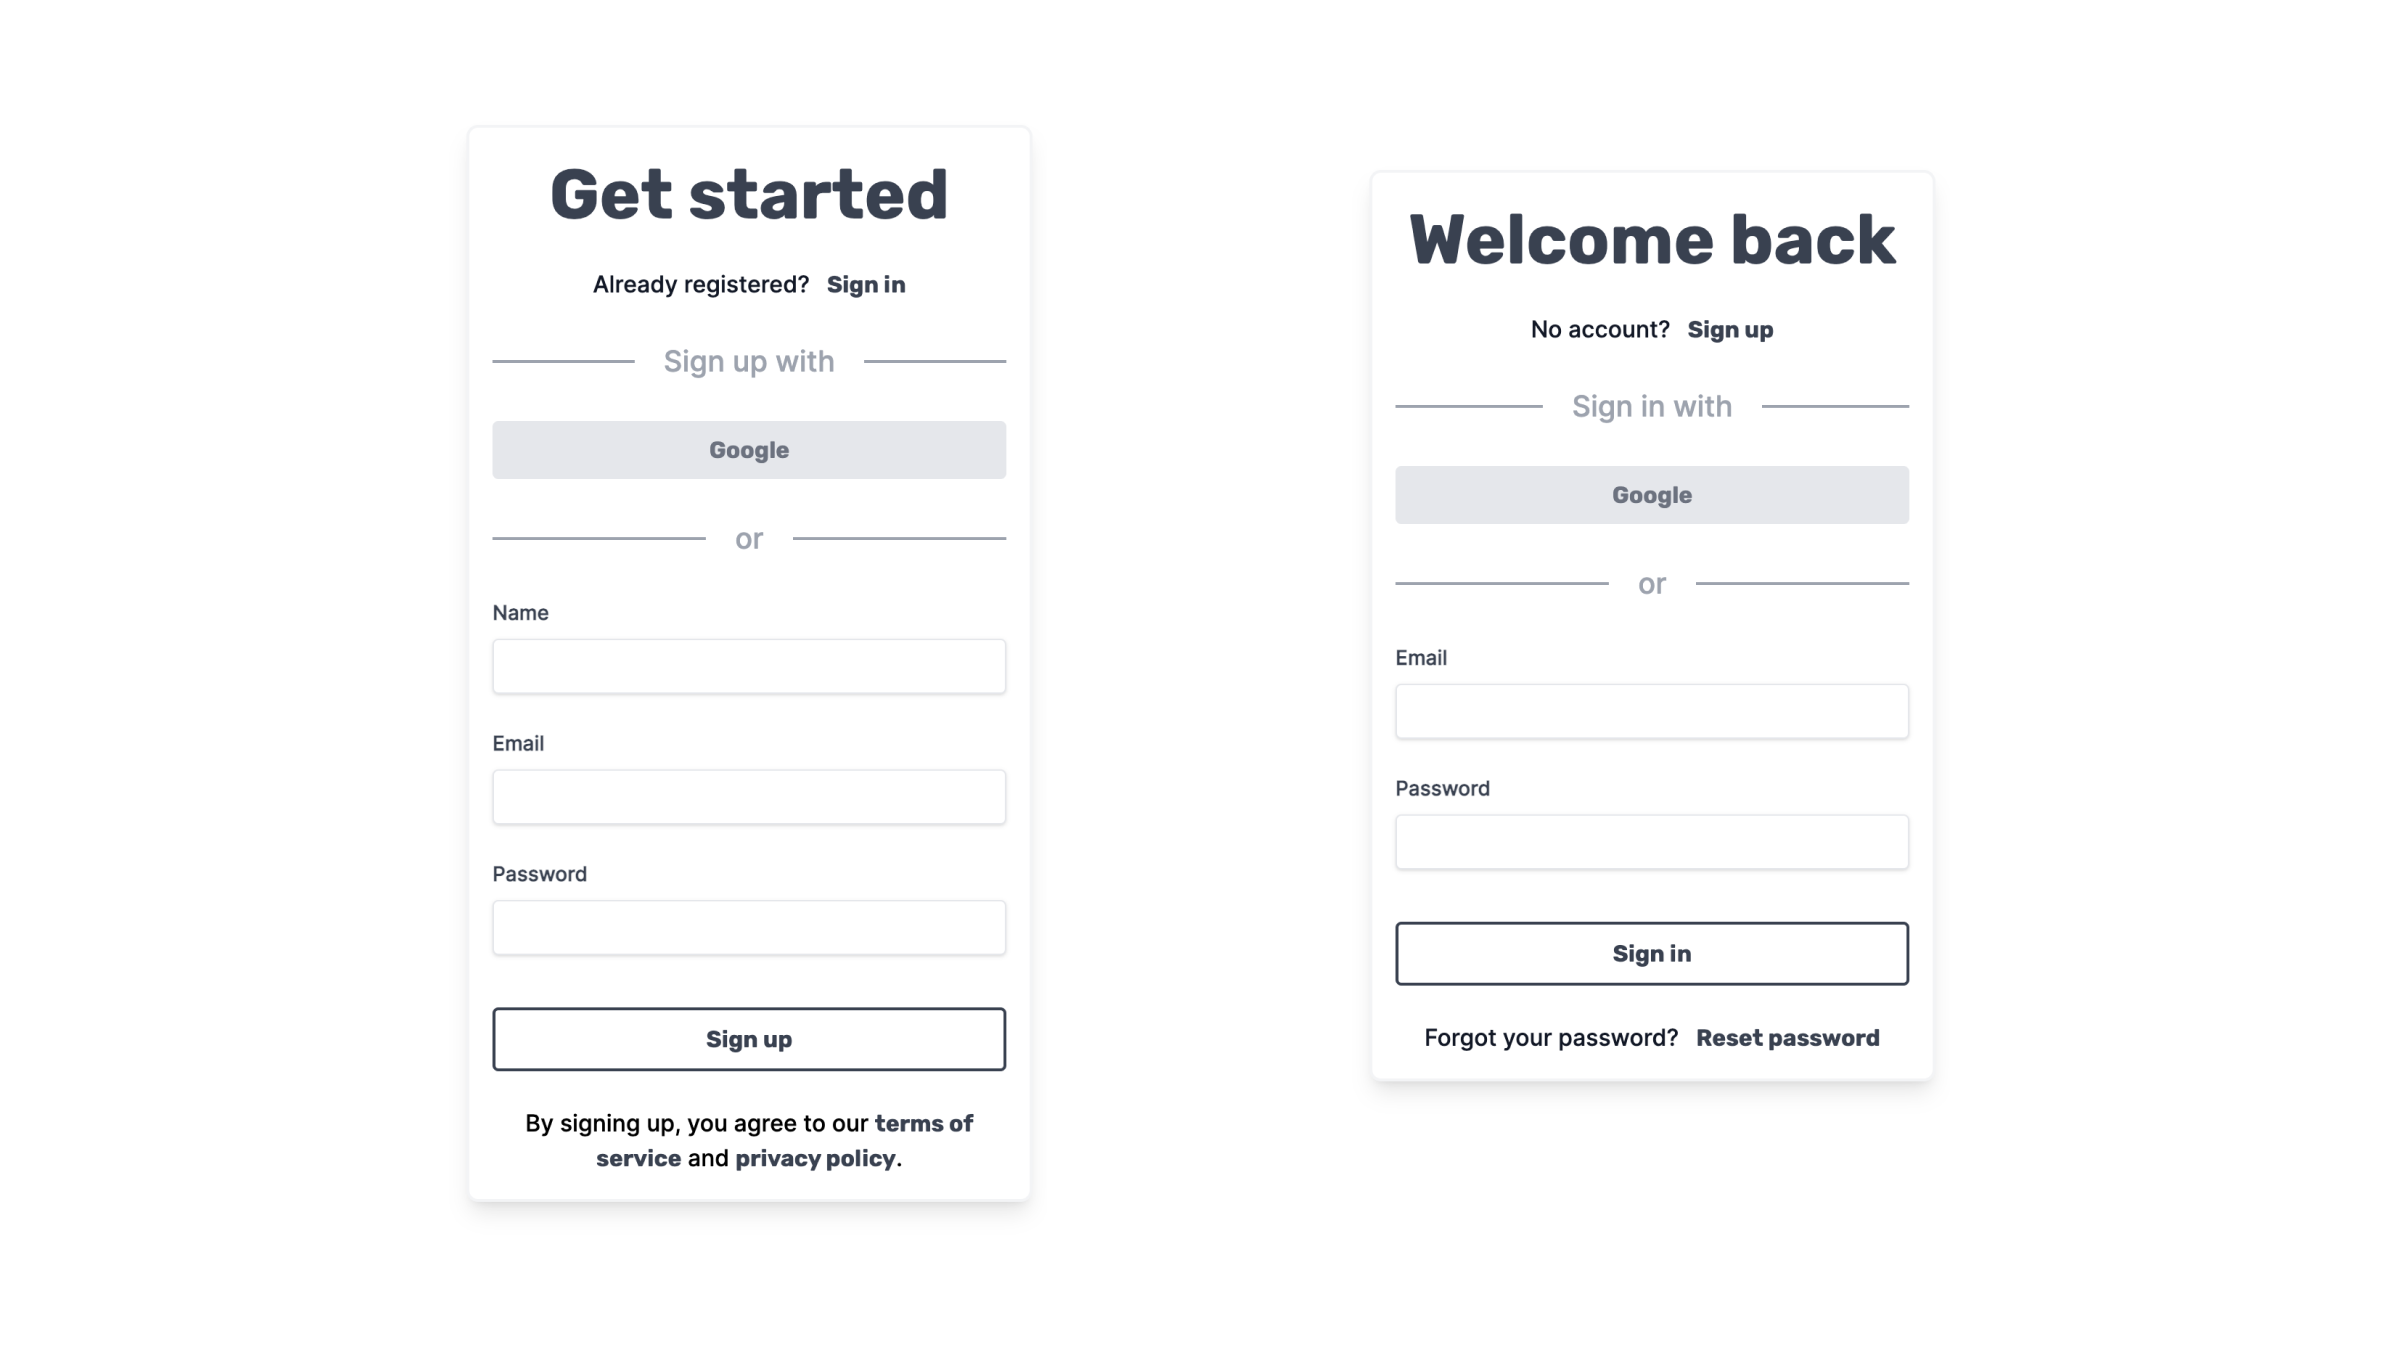
Using some basic JSX and Tailwind CSS, I designed two forms. One for the new users to sign up and another one for existing users to sign in. Here's how they look.
Next up, I installed the Supabase library and hooked it up to my application. This was very straightforward, as Supabase provides great documentation for a quick start with Next (the JavaScript framework that I'm using). Wait, you are using another framework? Don't worry, Supabase got you covered, whether you are using Angular, React, Vue or Svelte.
In the quick start documentation, Supabase Auth UI is utilized for creating sign-in and sign-up forms. It's quick and easy to implement. It has different themes and supports providers. In my case, I wanted to have a custom design, but if you're looking for a fast setup, you should give it a go.
Even though I'm utilizing a custom form design, it doesn't make things that much more complicated. We will be using three functions from the Supabase library: signInWithPassword(), signUp() and signOut().
Sign up
const [name, setName] = useState<string>("");
const [email, setEmail] = useState<string>("");
const [password, setPassword] = useState<string>("");

const [success, setSuccess] = useState(false);

const supabase = useSupabaseClient();

const signUp = async (e: FormEvent) => {
    e.preventDefault();

    const { data, error } = await supabase.auth.signUp({
      email,
      password,
      options: {
        data: {
          name,
        },
      },
    });

    if (error) {
      console.log(error);
    }

    if (data) {
      setSuccess(true);
    }
};

return (
    {/* ... */}
    <form onSubmit={signUp}>
        <input
            id="name"
            type="text"
            onChange={(e) => setName(e.target.value)}
        />
        <input
            id="email"
            type="email"
            onChange={(e) => setEmail(e.target.value)}
        />
        <input
            id="password"
            type="password"
            onChange={(e) => setPassword(e.target.value)}
        />
        <input type="submit" value="Sign up" />
    </form>
    {/* ... */}
)
First, we initialize three states, which change depending on the user input. After the user submits our form, we execute the signUp() function. The function takes in FormEvent, so we can prevent the default behaviour. Then we fire the supabase.auth.signUp() function, which takes in an email and a password. You can also add optional data, in my case I send the user's name which will be added to the database, more on that later.
The fourth state (success) is then used to display a message asking the user to confirm their email.
Find out more about signUp() 👉 HERE
Sign in
const [email, setEmail] = useState<string>("");
const [password, setPassword] = useState<string>("");

const supabase = useSupabaseClient();
const router = useRouter();

const signIn = async (e: FormEvent) => {
    e.preventDefault();

    const { data, error } = await supabase.auth.signInWithPassword({
      email,
      password,
    });

    if (error) {
      console.log(error);
    }

    if (data) {
      console.log(data);
      router.push("/studio");
    }
};

return (
    {/* ... */}
    <form onSubmit={signIn}>
        <input
            id="email"
            type="email"
            onChange={(e) => setEmail(e.target.value)}
        />
        <input
            id="password"
            type="password"
            onChange={(e) => setPassword(e.target.value)}
        />
        <input type="submit" value="Sign up" />
    </form>
    {/* ... */}
)
As you probably already noticed, it's almost the same as our sign-up component. The only difference is that we utilize the supabase.auth.signInWithPassword() function. It also redirects the user to another page, once signed in.
Find out more about signInWithPassword() 👉 HERE
Providers
If you want to give your users more freedom on how they can sign in. You can use any providers that Supabase offers. I couldn't even fit all of them into this screenshot, that's how many there are.
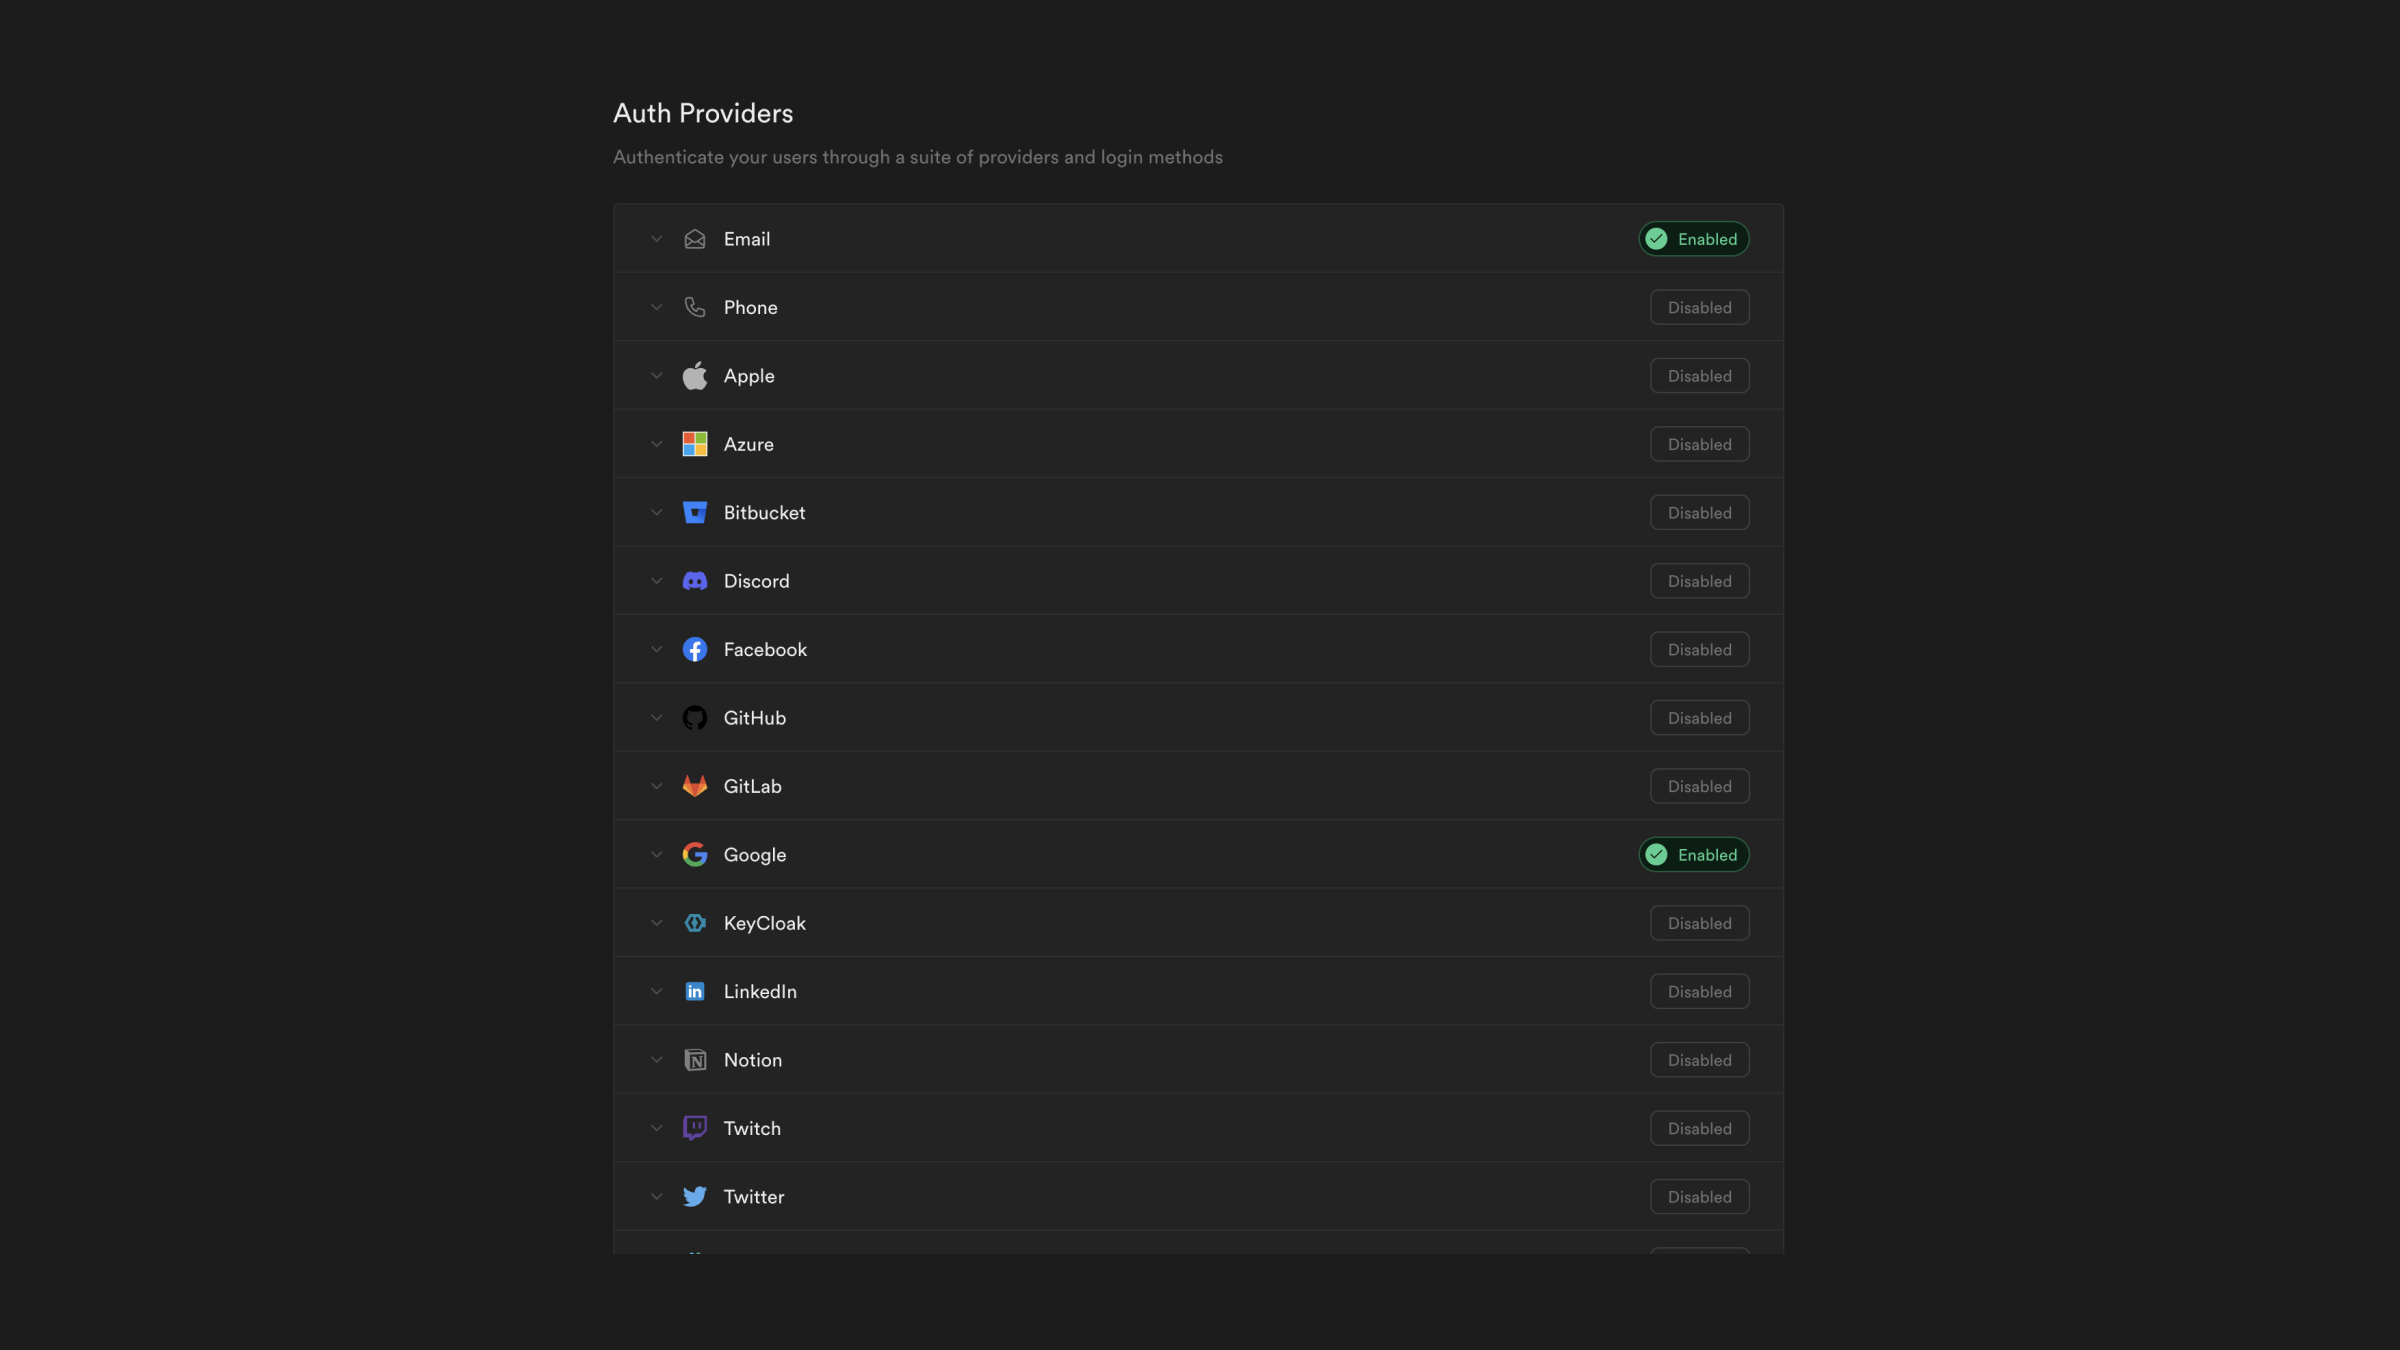
As Gmail services are fairly widespread, that's the only provider I'm offering in my application. It's also easy to implement into the code, but needs some setup in advance using Google Cloud Platform and Supabase Dashboard. But don't be afraid, the process is greatly documented.
const supabase = useSupabaseClient();

async function signInWithGoogle() {
    const { error } = await supabase.auth.signInWithOAuth({
      provider: "google",
    });

    if (error) {
      console.log(error);
    }
}

return (
    {/*...*/}
    <button onClick={signInWithGoogle}>
        Google
    </button>
    {/*...*/}
)
When the button is clicked we call signInWithGoogle() which fires supabase.auth.signInWithOAuth where we can specify the provider we want to use, in this case, it's Google.
Find out more about providers 👉 HERE
Sign out
const supabase = useSupabaseClient();

const signOut = async () => {
    const { error } = await supabase.auth.signOut();

    if (error) {
      console.log(error);
    } else {
      router.push("/studio");
    }
};

return (
    <button onClick={signOut}>
        Sign out
    </button>
)
If you thought providers are easy to implement, then signOut() is just kindergarten. It's crazy how easy Supabase makes it to set up authentication that I would spend weeks implementing using Express and Passport.
Find out more about signOut() 👉 HERE
Database
As mentioned earlier, I set up authentication in advance for pricing plans. But we can already now utilize it to keep our users updated on how the development of Mockury is going on. For that, we need to keep track of users who want to receive our newsletter issues.
Even though, you can create tables using Supabase's GUI. It's even better to know some basic PostgreSQL, so you can set up tables faster and utilize RLS (Row Level Security).
My favourite way (and probably the fastest way) to create tables is to utilize quick-start templates offered by Supabase. Choose the template you want to use, modify your query and run your SQL snippet. It's that simple.
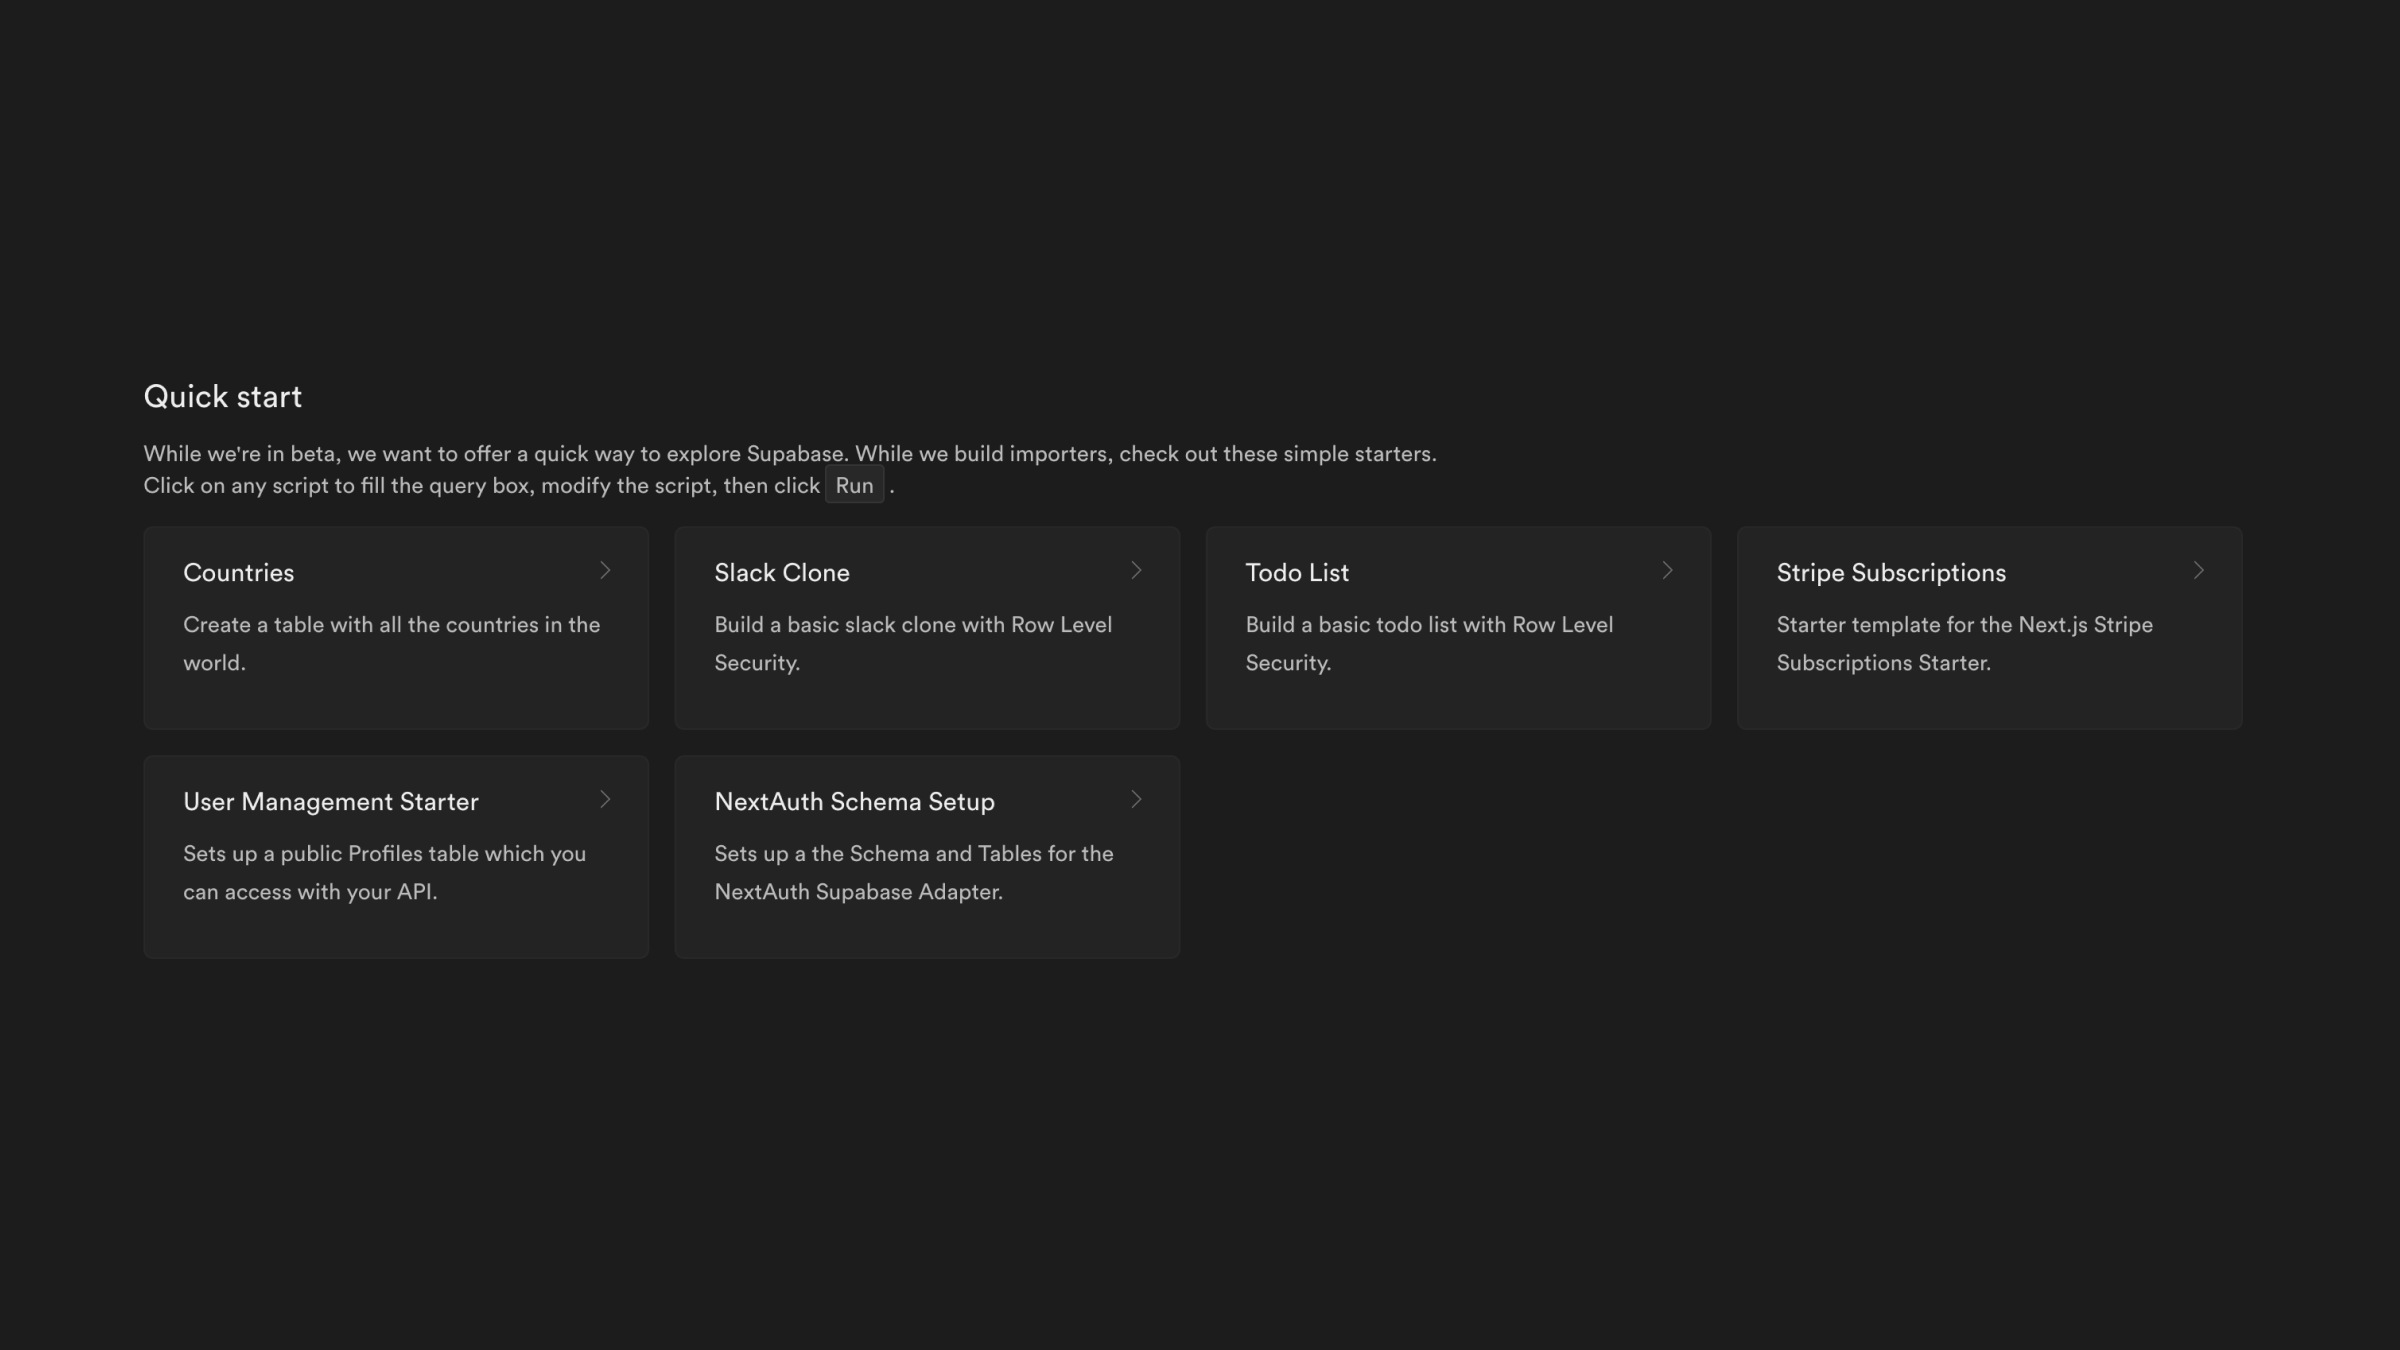
As I'm not that good with SQL, I like to duplicate the template. If I do something wrong, I would just switch between them and compare the original with my modified snippet, find the problem and make changes.
For our user database, we will be using the User Management Starter template.
create table users (
  id uuid references auth.users not null primary key,
  email text not null,
  name text not null,
  newsletter boolean default true not null
);

alter table users
  enable row level security;

create policy "Users can view their own info." on users
  for select using (auth.uid() = id);

create policy "Users can insert their own info." on users
  for insert with check (auth.uid() = id);

create policy "Users can update own info." on users
  for update using (auth.uid() = id);
Here's my table. We got the user's identifier, user's email, user's name and if they want to subscribe to the newsletter.
We also have RLS (row-level security) enabled, so each user can only get, set and change their data and stop any possible misbehaviour.
Now we have the table, how do we add the users to our database? Let me introduce you to triggers and functions.
Triggers and functions
Triggers listen for events such as insert, update or delete. Once one of your specified events is triggered, the trigger calls a function.
Functions are SQL snippets that contain assignments, declarations, loops, flows-of-control, etc.
create function public.handle_new_user()
returns trigger as $$
begin
  insert into public.users (id, email, name)
  values (new.id, new.email, new.raw_user_meta_data->>'name');
  return new;
end;
$$ language plpgsql security definer;
create trigger on_auth_user_created
  after insert on auth.users
  for each row execute procedure public.handle_new_user();
First, we create a function that inserts the user data into our user database. Using new.raw_user_meta_data we can access the optional data that we provided during the sign-up, in my case I only wanted the name of the user. By now, you probably noticed that one column is missing: newsletter. This is because when creating the table, we used the default true statement which sets our newsletter value to true automatically as long as no other data is provided. We will allow users to modify it later.
In the end, we create a trigger which calls our newly created function once a new user has been added to the auth.users table, which is provided by default by Supabase.
Manipulating data
Not every user wants to receive the newsletter, and that's fine. We shouldn't force it onto them, so let's provide a checkbox button which will change the value of newsletter.
const [newsletter, setNewsletter] = useState<boolean>(true);

const session = useSession();
const supabase = useSupabaseClient();
const router = useRouter();

useEffect(() => {
    const getData = async () => {
      const { data, error } = await supabase
        .from("users")
        .select()
        .single();

      if (error) {
        console.log(error);
      }
      if (data) {
        setNewsletter(data.newsletter);
      }
    };

    getData().catch(console.error);
}, [supabase]);

const updateNewsletter = async () => {
    const { error } = await supabase
      .from("users")
      .update({ newsletter: !newsletter })
      .eq("id", session?.user?.id);

    if (error) {
      console.log(error);
    }

    setNewsletter(!newsletter);
};

return (
    {/* ... */}
    {newsletter ? (
        <button onClick={updateNewsletter} className="btn">
            Deactivate
        </button>
     ) : (
        <button onClick={updateNewsletter} className="btn highlight">
            Activate
        </button>
     )}
    {/* ... */}
)
When the settings page renders, we fetch the current value of newsletter using supabase.from().select() which decides which checkbox button we should show.
Find out more about select() 👉 HERE
Once the button is pressed, we update our database using supabase.from().update() where we have to provide the user ID due to RLS. We also update the newsletter state on the client side to display the appropriate button.
Find out more about update() 👉 HERE
Now I have a collection of users with their newsletter preferences. Using Supabase's table editor, I can filter users who want to receive my newest newsletter issue, export the data to CSV and send out the issue.
Check out Mockury and sign up for the newsletter to see how it works yourself!
Thanks for reading! ❤️ This article is part of the Content Storm which celebrates SupaLaunchWeek 6. If you want to be the first one to see my next article, follow me on Hashnode and Twitter!